You bought what looked like a high-end leather bag. The seams split after just a few months. Yet vintage leather bags from decades ago still look great. What’s the difference? Proper stitch tension for bags—a key factor that many overlook. This separates quality craftsmanship from products headed for the trash.
Are you shopping for your next leather bag? Maybe you’re fixing problems with your current one. Or perhaps you craft leather goods yourself. Either way, stitch tension affects how long your leather bag lasts. Understanding this changes how you judge quality.
This guide shows you the technical side of lasting seams. You’ll learn to spot signs of expert tension control. Plus, you’ll see the weak points that ruin even expensive leather goods. By the end, you’ll know which bags last for years—and which just look nice in the store.
What is Stitch Tension and Why It Matters for Leather Bags
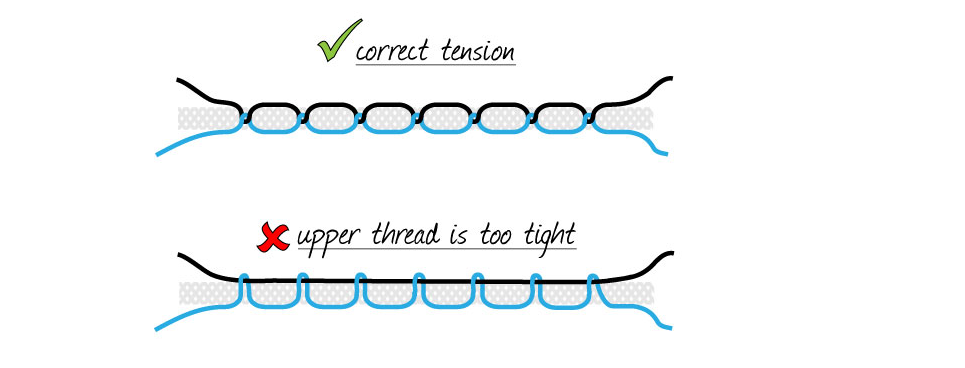
Every stitch in a leather bag involves two threads fighting for position. The upper thread pulls down, while the bobbin thread pushes back up. Where they meet and lock is what ultimately determines bag stitching durability and the long-term performance of the product.
Stitch tension controls the force applied to each thread during sewing. The top tension draws the upper thread into the leather layers, stopping just before it breaks through the bottom surface. The bobbin tension resists this pull from below. When these forces are perfectly balanced, the threads interlock precisely at the center of the leather stack. This balance is a core detail of leather bags craftsmanship, directly affecting strength, wear resistance, and how well the bag holds up through years of daily use.
Think of it like a handshake buried inside your bag’s seam. Too much pressure from either side ruins the grip.
The Sweet Spot: Balanced Tension
Proper stitch tension for leather bags follows one rule: use the lowest tension that still forms a solid lock. This prevents three common failures:
- Railroad tracks on the surface (visible bobbin dots from too much top tension)
- Weak top stitching that looks loose (bobbin tension overpowering the upper thread)
- Seam puckering that wrinkles and weakens the leather around each hole
Pro leather craftsmen use a simple test to adjust tension. Flip your bag inside-out. The thread knots should sit invisible—buried at mid-thickness, not showing on either side. See dots of bobbin thread on top? Dial down your upper thread tension. Notice loose upper thread underneath? Reduce your bobbin tension or bump up top tension a bit.
Why Tension Affects Seam Strength
Leather acts different than fabric. Push tension too high and you stress more than just the thread. You stress the leather itself at every needle hole.
Industry testing standards (ISO 23910, SATRA TM180) measure how much force a seam can handle before it fails. These tests show a key finding: unbalanced tension creates stress points at the leather surface. The thread doesn’t break under load. The leather tears at the stitch holes instead.
For bag construction, the best stitch density ranges between 3–4 stitches per centimeter (about 7.6–10.2 SPI). Go denser and you perforate the leather. Add excessive tension on top of that? You’ve built a failure point into every seam.
Real-world data backs this up. Tests on vegetable-tanned bag leather using 7 SPI and #5 polyester thread (168 TEX, 0.6mm diameter) show seam capacity around 241 pounds. But there’s a catch. That number needs balanced stitching with proper tension. Crank the tension dial too high? The seam fails at half that load. The leather rips instead of the thread snapping.
Tension settings separate bags that last decades from those that split after months.
Signs of Proper Stitch Tension in Quality Leather Bags
Quality leather bags show their craftsmanship through specific visual and touch markers. Spotting these signs protects you from costly mistakes. You’ll know durable construction when you see it.
Visual Inspection: Stitch Spacing and Line Consistency
Even stitch spacing is your first quality checkpoint. Pick up any quality leather bag and examine the seams. The distance between needle holes should stay consistent within ±0.2–0.3 mm variation. Your eye won’t catch tiny differences. But obvious “long-short-long” rhythm patterns? That’s a red flag.
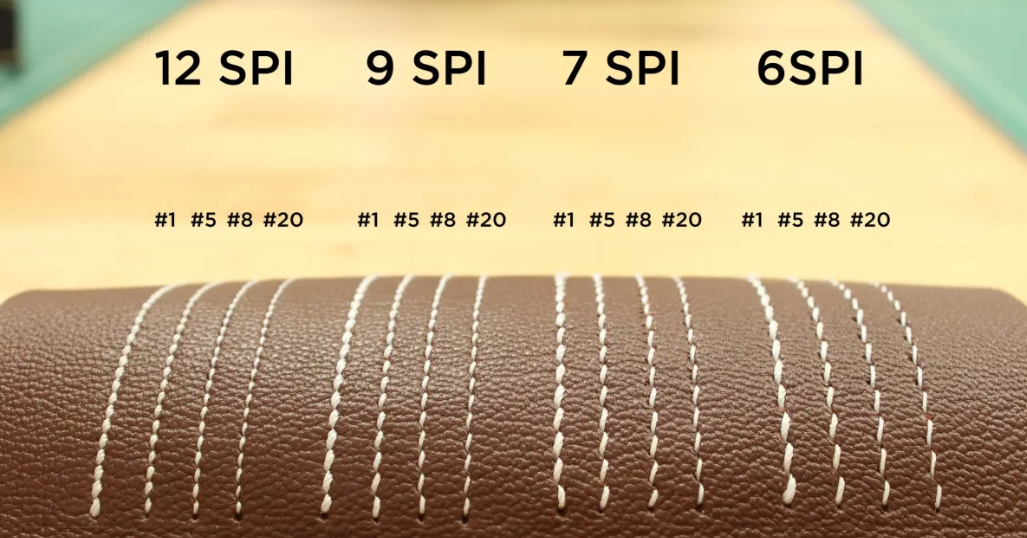
Professional leather bag construction follows specific stitch density guidelines:
- Large bags and luggage: about 7 SPI (stitches per inch), creating 3.8 mm spacing between each stitch
- Medium and small leather handbags: around 9 SPI, with 3.0 mm stitch spacing
- Decorative stitching only: 10–12 SPI (2.1–2.5 mm) reserved for non-structural areas to avoid over-perforating stress points
Run your eyes along the edge seams and joining lines. Straight-line bag precision matters. The stitch path should form clean straight lines or smooth curves. No snake-like wiggling or inconsistent edge distance. Corner transitions need distributed holes that create smooth arcs without bunching.
Check the leather surface on both sides of each seam. Zero puckering or waves means proper tension. See wrinkled leather, rolled edges, or visible “trenches” beside the stitching line? The maker cranked tension too high. Or they used too much stitch density that stressed the material.
Examine individual needle holes with good lighting. Each hole should match the thread diameter—filled but not stretched. The thread sits inside without wiggle room. Yet the hole shows no tearing or frayed edges around it.
Visual Balance Check: Thread Lock Position
Flip your bag inside-out to reveal the underside seams. Proper stitch tension creates identical-looking stitches on both surfaces. The thread lock point—where upper and bobbin threads interlock—should hide buried at mid-thickness within the leather layers.
Look for these balance indicators:
- Matching stitch appearance on front and back surfaces with similar tightness and shape
- No groove formation where thread cuts deep into the leather surface; proper tension lets thread sit in a gentle depression while keeping its round cross-section
- Zero loose loops or floating thread segments on either side—any slack loops, skipped stitches, or raised thread sections signal unbalanced or weak tension
Touch Testing: Firmness and Stability
Physical testing confirms what your eyes see. Pinch along the seam with your fingertips while flexing the leather. The thread should feel flush against the surface with no lifting or shifting. Bend the seam. Threads stay anchored in their holes without visible gaps opening up.
Try the fingernail test by pushing sideways against the stitching line. Quality construction resists lateral movement. The thread row might shift a bit due to natural leather and thread elasticity. Then it springs back to position. Easy sliding or permanent displacement? The tension is too loose.
Run your palm across seam edges. Smooth transitions between leather and thread mean balanced tension. Harsh ridges or knife-edge creases along stitching lines show too much force. That crushes the leather fibers.
Practical Pull Test for Finished Products
Test non-critical seam sections (like mid-panel side seams, never handles or stress points). Grasp the leather on both sides of a seam. Apply moderate separating pressure. The leather may stretch a bit—that’s normal elasticity. But watch the needle holes. They shouldn’t widen much or begin tearing at the perforation points. The stitching shouldn’t shift or expose buried thread segments.
This simple test simulates real-world stress. Bags with proper tension maintain hole integrity and thread position under reasonable force. Weak tension settings show themselves right away through hole deformation or thread slippage.
Problems Caused by Incorrect Stitch Tension

Wrong tension settings destroy leather bags in predictable patterns. The damage starts invisible. Then it snowballs into structural failure that no amount of care can reverse.
Tension Set Too Loose
Flip a poor-quality bag inside-out. Thread loops form visible “eyes” on the underside—clear proof the upper thread never locked with the bobbin thread. These loops tell you the upper tension dial sits too low. Or the thread bypassed the tension discs during threading.
Severe cases create “bird nests”—tangled thread masses on the bottom surface. The upper thread feeds without resistance. It piles up in knots instead of forming clean locks.
Check the seam edges where two leather pieces meet. Visible gaps between the layers mean loose stitching failed to compress the materials together. Thick leather construction suffers most from this problem. The thread sits in the needle holes doing nothing useful. Run your fingernail across the stitching. The thread shifts sideways with ease. It never embedded into the leather fibers.
Look at the top surface color. See lots of bobbin thread showing? The bobbin tension overpowered weak upper tension. It pulled everything to the bottom side.
Performance Failures from Loose Tension

Gaps widen under use. Common bag and tent construction shows seam spacing can increase by 10–30% of the designed overlap width with loose tension. These micro-gaps form continuous weak channels along every seam.
Water and dust penetration becomes unavoidable. Loose stitching fails to compress around needle holes. Each puncture creates a leakage pathway. Field testing on rain gear and backpacks shows seepage starting at just 500–1,000 mm water column pressure with loose tension. Correct tension withstands much higher pressure in the same materials.
Seam failure speeds up fast. Thread slack creates a dangerous load pattern. The thread stretches first under stress. Then it snaps tight without warning. This whiplash effect puts all the impact force at weak spots—corners and endpoint ends take the worst hit. Load-bearing seams like shoulder straps and handles look fine at first. But gaps appear between stitches at just 10–20% of rated capacity. Lifespan drops 30–50% compared to correct tension construction.
Abrasion resistance drops hard. Loose thread floats above the surface. This exposes more length to friction. The protruding sections wear down 1.5–2 times faster than embedded stitching under the same use conditions.
Tension Set Too High


Puckering marks the crime scene. Too much tension pulls the leather into wrinkles along the seam line. The material bunches and contracts. This creates permanent creases that weaken the structure.
Check the surface for another clear sign: bobbin thread dots covering the bag top surface while the bottom shows lots of upper thread. The upper tension yanked the bobbin thread all the way through the leather thickness. Thread lock position shifted to the wrong surface.
Look at individual needle holes up close. Stretched, elongated perforations with cutting marks around the edges show thread tension exceeded leather strength. In quality leather, the holes appear a bit oval. They’re pulled toward the stitching direction. The thread diameter compressed flat and carved into the material instead of sitting in round holes.
Material Damage from Too Much Tension

Leather develops ripple patterns with tight thread and improper feed timing. Using 2–3 mm stitch spacing with fine thread at high tension creates continuous waves in thin leather. The thread contracts along the seam direction. It drags the material with it.
Stress concentration becomes deadly. Extreme tension focuses load onto tiny contact areas around each needle hole edge. This happens instead of spreading force through mid-thickness thread locks. Stress concentration factors multiply beyond design limits. Repeated flexing at bag flaps, corners, and fold lines triggers fatigue cracks far sooner than expected.

Crack spread follows a specific pattern in leather and coated materials. Tight thread “strangles” fibers around each hole. Bending cycles and moisture changes cause cracks to chain from hole to hole. This forms continuous “stitch tears” along the seam. Coated fabrics show this clearly—after 5,000–10,000 flex cycles, white crack lines appear following the stitch path. The coating couldn’t handle permanent compression from over-tensioned thread.
Thread Type and Tension Match for Long-Lasting Seams

Thread material controls how much tension your leather can take before it fails. Different fibers react to pulling stress in opposite ways. Pair the wrong thread with your tension settings? Your bag seams will fail early.
Bonded Nylon vs Waxed Thread: How They Stretch
Bonded nylon thread stretches 15–30% before breaking. This high stretch creates a wide tension range that works. The thread absorbs shock by extending a bit under stress. It bounces back to normal length once the force stops.
Waxed thread (cotton, linen, or polyester with wax coating) stretches less than 5–8% during actual use. The wax layer stops quick stretching. You get “stiff” and “low-stretch” behavior. The thread won’t give much before it breaks.
This stretch difference means you need specific tension rules:
Bonded nylon thread works best at 25–35% of its breaking strength. Inside this range, the thread handles repeated stress without permanent stretch. Lab tests show that loads below 5% of breaking force cause almost zero permanent change after release. This is the “safe elastic zone” for any thread.
Waxed thread needs gentler handling. Keep single-cycle working tension at 15–25% of breaking strength. This prevents fiber breakage and wax layer cracks. For best durability under constant tension, drop this to 10–15% of breaking strength. These lower values protect the brittle wax coating from damage.
Fatigue Resistance and How Performance Drops
Lab tests show key performance limits. Most threads barely change length after release if tension stays below 5% of breaking force. This creates a practical “no permanent change zone” for tension settings.
Thinner threads break down faster under the same tension cycles. Fine threads lose more strength and suffer more internal damage (measured by electrical resistance changes) than thick threads under the same repeated stress.
Real Tension Settings by Thread Weight
Industrial sewing machines run at 10–25% of thread breaking strength. This balances stitch formation with long life. Here are tested working tension values for common thread sizes using bonded nylon or polyester (measured as thread pull force):
- Tex 15–20 (size #60–#80): 0.3–0.5 N working tension (about 10–20% of breaking force)
- Tex 30 (size #40): 0.5–0.8 N working tension
- Tex 40–45 (size #30): 0.7–1.2 N working tension
- Tex 60–70 (size #20): 1.0–1.6 N working tension
- Tex 90–135 (size #15–#10 heavy thread): 1.5–3.0 N working tension
Fine threads need tighter control. Keep working tension below 20% of breaking strength for best durability. Their performance varies more near breaking loads. You’ll see higher leftover stretch and faster strength loss.
Heavy threads handle higher tension—up to 25–30% of breaking strength. They show less performance drop under the same proportional loads.
How to Use This for Leather Bags
Pick bonded nylon thread for high-durability and high-tension work. Set your machine tension dial to 20–30% of the thread’s rated breaking strength. This gives you strong seam compression plus long fatigue life.
Use waxed thread for hand-sewn leather goods where looks and traditional feel matter. Cut tension settings by 20–30% compared to equal-weight nylon thread. This stops brittle breaks in the wax coating and base fibers.
Why Sunteambag’s Stitch Tension Control Ensures Decades of Durability
We build leather bags to outlast trends and survive decades of tough use. The secret? Precision stitch tension control at every key seam. Plus, we test every bag to find weak points before it ships to you.
Stress-Zone Reinforcement Through Measured Tension
High-stress areas need different tension settings than decorative stitching. We apply 8–12 stitches per inch at handle attachment points, zipper edges, and bottom corners. These zones take the most force during real use. This stitch density gives you strength. It doesn’t over-perforate the leather.
Each stress point gets double-stitched seams with bar-tack reinforcement. Bar-tacking creates dense, cross-pattern stitching. Load spreads across multiple thread paths. Handle mounting points feature these reinforcements. They prevent the single-point failures you see in cheaper bags.
Tension calibration follows strict force standards. Seam tensile strength tests verify every key seam. Each one withstands minimum 150N force. No thread breakage. No more than 1cm slippage. Testing uses universal machines at 100 mm/min stretch speed. We follow ISO 13934-1 and ASTM D5034 protocols. Shoulder straps face tougher requirements—300N minimum. No tearing, breaking, or detachment from the bag body.
Handmade Reinforcement vs. Standard Machine Work
Our hand-reinforced edges outlast standard machine lockstitch construction. Testing data shows handmade construction with reinforced stitching achieves 15–20 N/mm² tensile strength. Typical machine lockstitch seams only reach 8–12 N/mm². You get 30–40% longer abrasion life at high-wear zones. Think shoulder strap contact areas and bottom edges.
Every handle attachment survives 10+ kg loads of soaked gear. No tearing. This capacity comes from balanced stitch tension. Thread locks stay centered in leather thickness. Stress doesn’t concentrate at surface perforations.
Quality control includes documented tensile testing. We record maximum loads and breaking points. Post-test inspection checks for seam slippage and hardware deformation. Every bag ships with verified durability built in.
Conclusion
Proper leather bag stitch tension matters more than you think. It separates a leather bag that falls apart in months from one that lasts a lifetime. Buying your first quality piece? Or refining your craft? Balanced stitching tells you right away how durable a bag really is.
Next time you shop for a leather bag, spend sixty seconds checking the stitches under good light. Run your fingers along the seams. Look for consistent threading where upper and lower threads lock in the leather’s center layer. These small details show the maker’s commitment to quality. They also show how well the bag handles years of use.
At Sunteambag, we calibrate every stitch tension setting for the leather thickness and thread type. Transparency about craftsmanship helps you make smarter choices. Ready to see what precision looks like? Explore our collection where bag stitch quality control meets timeless design. Or contact our team to learn how your bag is built to last decades.