Nothing beats the frustration of seeing a leather seam come apart after just a few uses. Learning how to backstitch when making leather bags makes all the difference. A well-made bag can last decades. One without proper stitching falls apart under stress.
Backstitching protects against seam failure. This matters most at handle attachments and bottom corners where stress hits hardest. This guide shows you machine and hand backstitching methods for leather bags. You’ll learn how to fix common problems like thread breakage and puckering. Professional leather artisans rely on these techniques to create clean, strong seams. We’ll also cover the essential tools that make your work easier and more dependable.
3 Common Ways to Backstitch Leather Bags
1. Machine Reverse Backstitch
This is the most common method for leather bags, especially medium to large projects.
Sew forward 2–3 stitches, then reverse using the same stitch length to lock the thread.
Longer stitches create a bolder look, while shorter stitches give tighter seams.
Usually, 2–3 backstitches are enough for a secure finish.
2. Machine Turn-and-Sew Backstitch
This method works well for small leather bag parts or machines without reverse.
Rotate the leather 180 degrees and sew forward again over the same holes.
No reverse stitching is needed, and the seam stays clean and strong.
3. Hand Saddle Stitch Backstitch
This is the strongest and most traditional technique for leather bags China.
Repeat the stitch through the last 2–3 holes to lock the thread.
Pull each stitch tight so the thread sits neatly into the leather.
Finish by passing the threads to the inside and trimming the ends.
Understanding Backstitching in Leather Bag Making
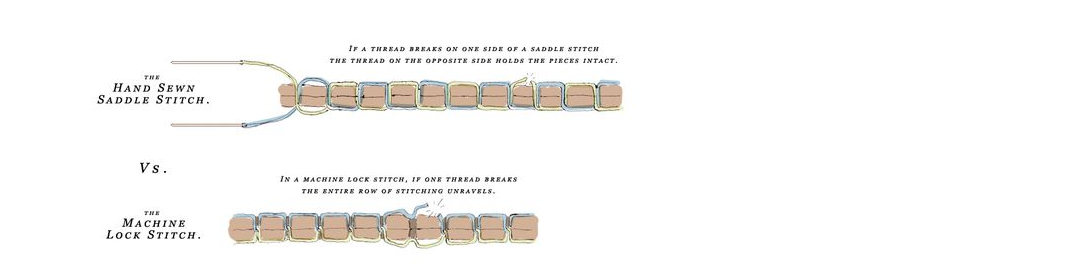
Backstitching makes overlapping stitches that strengthen seams. The stitch reverses direction at each endpoint. This doubles the thread density right where your leather bag needs it most. Two needles work together to create locked stitches inside the leather.
The strength difference is clear. A backstitch holds firm even when one stitch breaks. The seam stays intact. Standard straight stitches unravel fast once a single thread fails. Handle attachments and strap connections face constant pulling and stretching. Backstitching stops the major failure that ruins bags.
Why Backstitch Density Matters
Premium leather bags use 8-12 stitches per inch (SPI). This range balances strength with looks. Too few stitches create weak points. Durability suffers. Too many stitches put too many holes in the leather. This weakens the structure.
Your project size sets the ideal SPI:
– 7 SPI (3.8mm length): Large items like bags and cases using 432 Linen or #5 MBT polyester
– 9 SPI (3mm length): Medium items like wallets and pouches using 632 Linen or #8 MBT polyester
– 12 SPI (2.1mm length): Small items like watch straps using 832 Linen or #20 MBT polyester
Sewing at 9 SPI takes 30% more stitching time than 7 SPI. For hand-sewn commercial production, this means higher labor costs versus better looks.
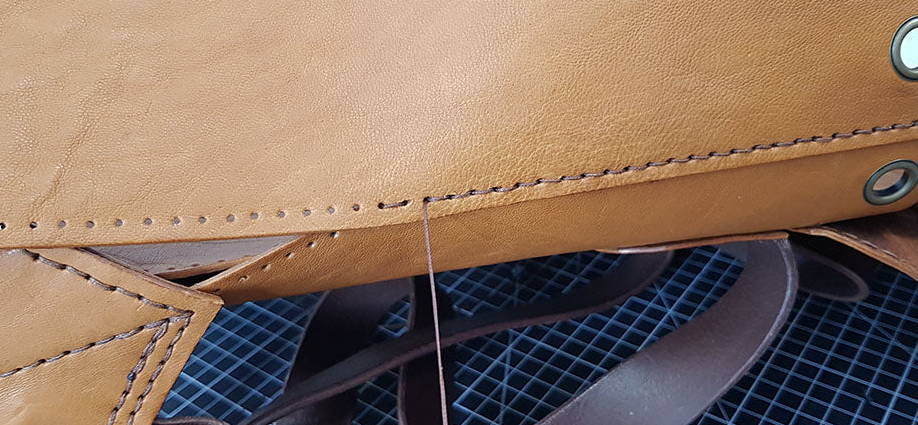
High-quality tanned leather makes uniform stitching easier. The consistent thickness and soft texture let your needle pass through with ease. Badly tanned leather with uneven thickness creates messy, uneven stitches. These look unprofessional.
Machine Backstitching Technique for Leather Bags
Your sewing machine’s reverse function is the base for strong leather bag seams China. Three methods work well. Each fits different projects and skill levels.
Standard Reverse Backstitch Method
Sink your needle into the leather and grab the loose thread tails. Sew forward 3 stitches. Pause as the needle rises about 1/8 inch (3mm) above the leather. Pull the reverse lever down. Sew backward for 2-3 stitches. This locks the seam and stops it from coming apart.
You can also flip this order. Sew 2-3 stitches in reverse first. Then move forward with your seam. This cuts down bulk at the start. You won’t stack three thread layers in one spot. This helps most with thick leathers.
Machine Settings That Control Stitch Quality
Your reverse stitch length needs to match your forward stitches. Loosen both thumb screws on your machine. Move them away from the midpoint plate for longer stitches. Set the top screw at the 3rd notch. Put the bottom screw at the 4th notch. This gives you balanced stitching. Test on scrap leather first.
Get the presser foot timing right. Lower the foot before you start stitching. Lift it after the needle rises to the right height—1/8 inch or 1/4 inch based on your method. Lifting too soon causes thread tension problems. You’ll get skipped stitches too.
The 180-Degree Rotation Approach
Small leather projects work great with this hands-free method. Reach the seam end and sink the needle down. Rotate the balance wheel until the needle rises 1/4 inch (6mm). Lift the presser foot. Turn your leather piece a full 180 degrees. Drop the foot back down. Sew forward over the same stitch holes.
This method works for items that fit in your machine’s throat space. Small pouches, card holders, and wallet pieces are good choices. Full-sized bags are too big. The rotation area can’t handle them.
Pull-Through Method for Precise Control
Sew your first 3 stitches at normal speed. Before the fourth needle goes in, raise your presser foot. Pull the leather toward you. Line up the needle right over the last hole. Lower the foot and finish the stitch. Do this pull-and-align process back to your start. Then keep sewing forward.
Watch out for common mistakes. Wrong needle position creates skipped stitches. Not pulling enough leaves loose, sloppy stitches. Keep steady tension through the whole pull-through process.
All three methods need 2-3 backstitches for strong holds on machine-sewn leather. Match your forward and reverse stitch lengths before you work on real pieces. Test all settings on scrap leather first.
Hand Saddle Stitch Backstitching for Leather Bags
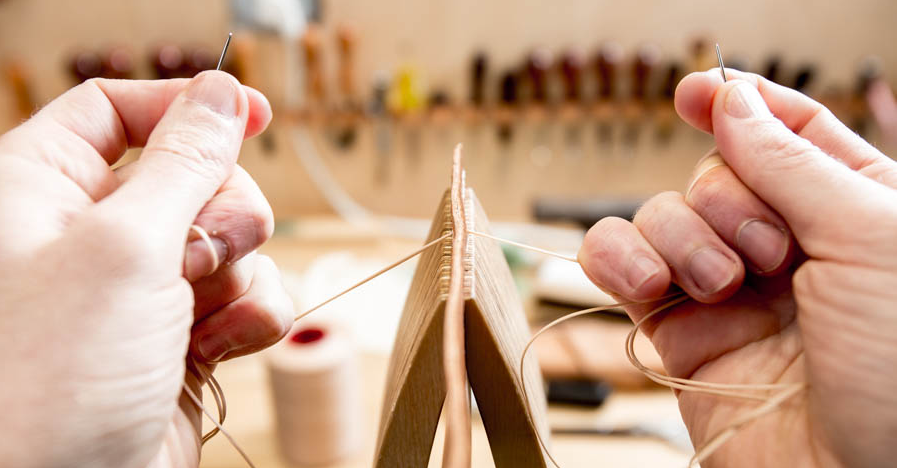
Two-needle saddle stitching beats machine work for seam strength. The backstitch finish locks your seams. It stops unraveling at stress points. Professional leather workers rely on a few proven methods to secure hand-sewn bag seams.
The MrLentz X-Cross Backstitch Method
Thread your right needle into the next hole moving away from you. Position your left needle in front to form an X-cross with both needles. Pull the right needle through until you see a loose tail exit. Don’t pull the full thread length yet.
Now rotate your work. Feed the left needle into that same hole behind the right thread. Push the existing thread away and guide your needle just behind it. Pull the left thread about 2 needle lengths to the right. This clears the pierced holes. Use your pinky fingers to control tension as you pull everything snug.
Repeat this X-cross pattern 1-3 times based on your needs. One pass works for typical bag construction. Three passes give extra security for handles and heavy-wear areas. Finish by moving both needles to the inward-facing side. Pass your left needle through the next hole to hide the thread tails inside.
The Double Pass Backstitch for Maximum Strength
Start with both threads pulled through your last stitch hole. Backstitch a minimum of 2-3 times. A single pass won’t cut it for leather bags. Thread your left needle into the hole behind your current position. Put the right needle through that same hole.
Tight holes with two threads plus leather thickness create resistance. Grab pliers or clamp your work in a stitching pony for better pull-through force. Tension control makes or breaks this technique. Pull both needles away from the leather with firm pressure after each backstitch. This matches your prior stitch tension. Loose pulls create enlarged, sloppy stitches.
Your first pass creates the standard saddle stitch. The return pass goes over those existing stitches. This forms a 4-layer lock. It spreads stress across multiple thread layers.
Weaver Supply Method for Secure Closures
Cut your thread at 4 times your project’s seam length with premium threads like Ritza Tiger Thread. This gives you enough length for proper backstitching. No waste either.
Backstitch 3-4 times by squeezing both needles through the prior hole. You’re forcing two threads through a space that already contains two threads. Secure your leather edges in a sewing pony with tight clips. This firm hold lets you create the squeeze pressure needed for a locked closure.
Critical Technique Points Across All Methods
Your needle entry angle affects stitch appearance. Always feed the second needle behind the first thread. This avoids creating bumps on your leather surface. Pull your right arm down and to the right. Move your left arm up and outward. This opposing pull creates even tension.
Watch for caught threads as your needle emerges on the backstitch. Tug the thread before looping it around. This pulls it off the needle if it’s pierced. Keep this rhythm going. It stops frustrating tangles mid-project.
Standard practice calls for 3 backstitches on low-wear bag areas. Handle attachments and strap anchors need the full treatment. Light-duty items can work with fewer passes. Always melt your thread ends with a lighter to prevent fraying. Keep the flame away from your leather. Work over a protected surface and trim excess before melting.
Tools and Materials for Backstitching Leather
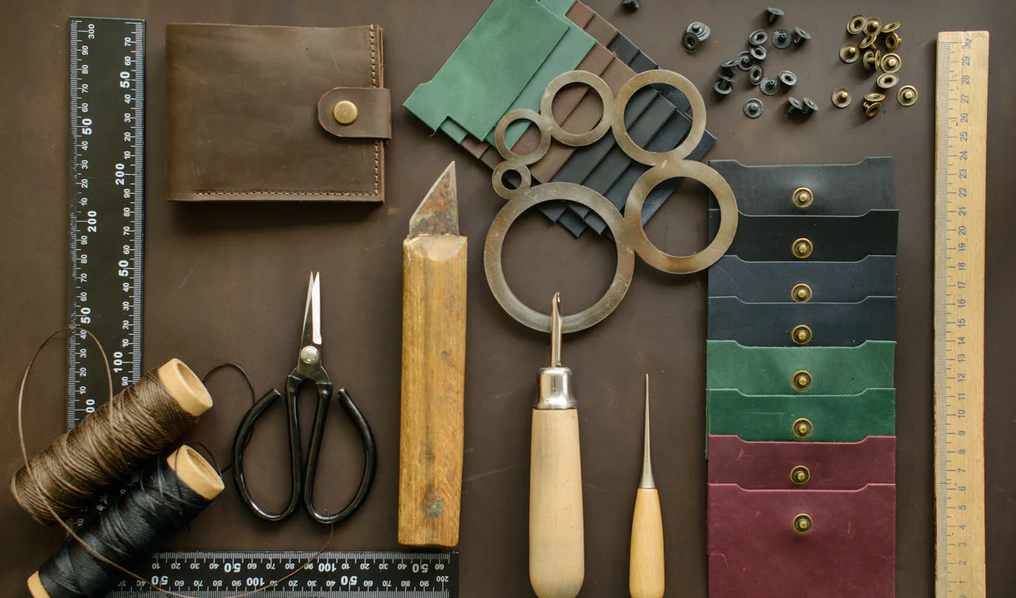
Leather backstitching needs special tools. Standard fabric sewing tools won’t work. Thick hides resist regular needles. Uneven hole spacing makes weak seams. The right gear turns tough leather work into clean, pro-level results.
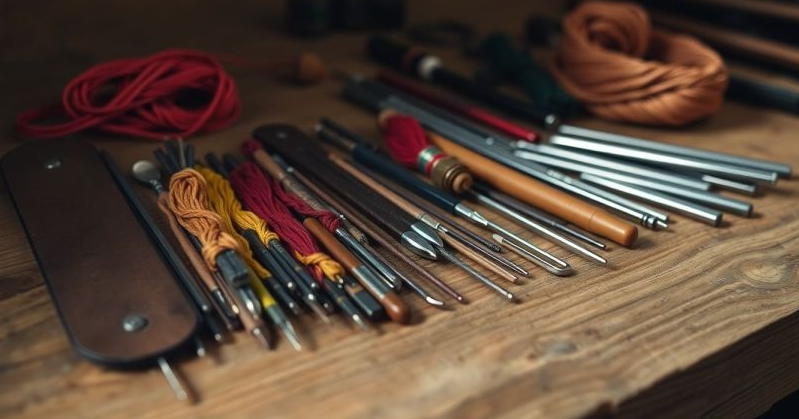
Essential Hand Sewing Tools
Leather needles are your starting point for hand backstitching. Grab two Glovers or China harness needles sized 1-8 for saddle stitch work. The triangular tip cuts through thick leather without splitting fibers. Large eye openings fit thick waxed thread. John James brand makes rounded tips that push through multiple layers without breaking. Buy extras—bent needles waste your time mid-project.
Pre-waxed thread in nylon or polyester holds tension better than cotton. Ritza Tiger Thread is the pro standard. This 100% polyester thread comes with a light wax coat for smooth pulls. Match thread thickness to your leather weight: 0.8-1.2mm diameter works for medium-weight bag leather. Linen thread suits traditional projects. Bonded nylon handles outdoor gear exposed to moisture.
Diamond awls create precise pilot holes that guide your needles. Pick awl sizes based on thread thickness—2-4mm spacing covers most bag construction. Hook awls work for lockstitch variations but don’t penetrate as cleanly as diamond shapes.
Stitching chisel sets punch multiple holes with even spacing at once. Start with a 2mm chisel. Sets include 2-6 prong options. Four-prong chisels give beginners good speed and control. Diamond hole punches cut angled slits that create the classic saddle stitch look. Strike chisels with rawhide or polymer mallets—metal hammers damage the cutting edges.
Marking and Grooving Equipment
Wing dividers mark parallel stitch lines 4-6mm from leather edges. This steady spacing stops edge tearing under stress. Adjust the screw tension to keep steady pressure as you trace.
Stitching groovers cut recessed channels 1-2mm deep along your stitch line. Buried threads resist abrasion and snagging. Blade depths adjust for different leather thicknesses. Run the groover before hole punching for best results.
Overstitch wheels mark dots with even spacing at 3-5mm intervals. Roll the wheel along your groove line. The raised dots show where to position your chisel. This removes guesswork. You get pro-looking seams with 4-6 holes per inch.
Support Tools and Materials
For leather bag manufacturing, you need stable holding tools and basic stitching accessories. A stitching pony or C-clamp is used to fix multiple leather layers, while leather glue keeps layers aligned before stitching. Poundo boards support clean chisel work, and common tools include chisels, a groover, needles, waxed thread, beeswax, sandpaper, and metal rulers. These tools are widely used in OEM leather bag production China to ensure consistent stitching quality.
With proper preparation, backstitching leather bags becomes faster and more accurate. By marking stitch lines, grooving, and pre-punching holes at even spacing, manufacturers can reduce errors and improve efficiency. This structured process helps leather bag factories deliver strong, clean stitches that meet B2B quality standards.
Quick Troubleshooting Reference
| Problem | Common Cause | Immediate Fix |
|---|---|---|
| Thread breaks every 6-8 stitches | Tension too tight | Reduce by 2 numbers, use larger needle |
| Wavy seam line | Presser foot pressure high | Drop pressure 30-40% |
| Backstitches look larger | Stitch length mismatch | Match forward/reverse to 0.2mm |
| Needle won’t penetrate | Dull tip or wrong angle | Replace needle, enter at 45° |
| Loose final stitches | Pulled too hard mid-seam | Steady pinky-controlled tension |
| Skipped holes on reverse | Needle height wrong | Raise to 1/4 inch before rotating |
Preventive steps cut troubleshooting time by 50%+. Test all machine settings on scrap leather before touching your actual project. Keep backup needles, pre-waxed thread, and extra chisels within arm’s reach. Mark your tension, pressure, and stitch length settings with masking tape once you dial them in. This saves you from re-adjusting for future bag projects using the same leather weight.
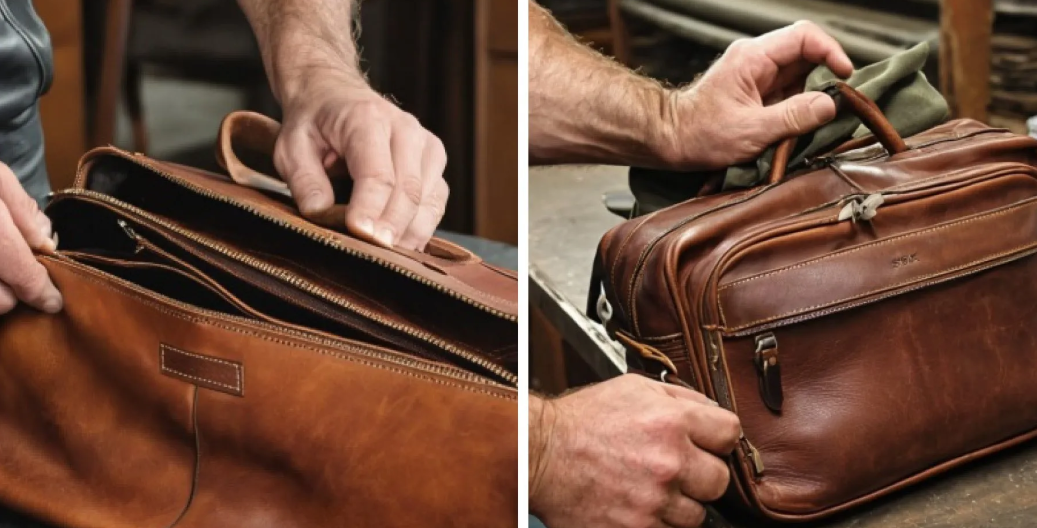
Finishing and Quality Check
Leather craftsmen check every seam before they finish a bag. Your backstitch quality decides if a bag lasts two years or twenty. A good quality check finds weak spots. These spots can cause major failure under weight.
Post-Stitching Seam Inspection
Pull each seam with 15-20 pounds of force. This tests how your bag handles real use. Look for thread stretching, loose stitches, or gaps between holes. Good backstitches don’t move at all. Bad ones show thread shifts of 1-2mm.
Check backstitch density at stress points. Handle attachments need 4-5 backstitches minimum. Count the overlapping thread passes at each endpoint. Fewer passes create the 32% defect rate that ISO 9001-certified workshops try to avoid. Bottom seams and strap anchors need the same count.
Check stitch alignment from both sides. Flip your bag inside-out. Exit holes should match entry points within 0.5mm tolerance. Holes that don’t line up mean the needle path wandered. This cuts seam strength by 25-30%.
Thread End Security Verification
Melted thread ends must fuse completely. No charring. A proper melt creates a 2-3mm rounded bead that won’t pull through the stitch hole. Black char marks mean overheating. The thread loses up to 40% of its strength. Re-trim and re-melt any burned ends.
Glued thread finishes need 24-hour cure time before stress testing. Good leather adhesives bond deeply. Rush the curing? Those bonds fail at 60% lower stress levels than fully-cured joints.
Load Testing Critical Components
Test handle attachments with 150% of intended bag capacity. A 10-pound capacity bag gets tested with 15 pounds. Suspend weight for 5 minutes. Watch all backstitch zones for thread movement or leather bending. The 80/20 rule applies here. 80% of handle failures come from poor backstitching at the top seam junction.
Bottom seams need flat-surface pressure tests. Load the bag. Place it on a firm surface. Add 120% of rated capacity. Check for stitch spreading or bottom panel warping after 10 minutes. Quality bottom work shows zero visible warping.
Final Appearance Standards
Run your fingertips along every seam line. You shouldn’t feel bumps, catches, or thread loops over 0.5mm height. Professional work creates smooth surfaces. Backstitches blend with forward stitching.
Measure stitch spacing with a ruler at three random seam points. Gaps within 0.3mm variation show proper technique. Larger gaps mean tension control problems. These cut bag lifespan by 15-20%.
Write down any fixes made during quality checks. Tracking patterns helps you spot repeat issues. Auto manufacturers used this same method. They improved uptime by 25% through careful quality tracking.
Conclusion
Backstitching your leather bags does more than secure seams. It helps every piece last for years. Machine stitching is fast and efficient, while hand saddle stitching adds a refined, handmade touch. Both methods can elevate your leather bag production from beginner level to professional quality.
Strong leather bags start with solid first and last stitches. Taking a few extra seconds to backstitch at stress points makes a real difference. Always choose tools that match your leather weight and check stitch quality before finishing. These simple steps reduce future repairs and help keep customers satisfied.
At Sunteam, we share practical insights on leather bag craftsmanship, stitching techniques, and manufacturing materials twice a week. Our goal is to help bag brands better understand production details, improve product quality, and grow with confidence through reliable manufacturing knowledge.